
2021 Update: Based on post and Reddit comments, the approach to unlock undervolting works for a number of models, including the XPS, Inspiron, G5, 11th Generation Intel processors, and 2021 Dell models and other lines. If it works for you, please leave a comment below so others may know!
Disclaimer: Changing voltages or editing BIOS settings not surfaced by your laptop manufacturer is risky and thus I give no guarantees or warranties that any of this will work well for you. This is merely a recap of my own experiences with making my Vostro 7500 run faster!
In July 2020 there was a deal-stacking slick deal on Dell’s new Vostro 7500 laptop with the Intel 10750H processor, so I went for it. But as hot as the deal was, it turned out the laptop runs even hotter. HWiNFO showed that the that the CPU package and cores quickly hit 100C, and the CPU thermal throttled upon opening pretty much any application. And unlike Intel laptops of the past, many in 2020, including the XPS, Vostro, and Inspiron, have undervolting disabled by default due to the Plundervolt vulnerability.
But I discovered there are a few ways to keep the laptop cooler, including the ability to unlock undervolting for the Comet Lake 10750H processor (skip to this section for this) without needing to flash a modded BIOS. The following steps allowed me to double my battery life, drop my idle temps by 20°C, and improve my FPS, in reversible ways that shouldn’t void the warranty, and most apply to other 2020 Dell models like the XPS and Inspiron as well:
- Easy BIOS Changes
- Enable Advanced Windows Power Plan Options
- Initial Throttlestop Tweaks
- Disable Unneeded Startup Processes with Autoruns
- Undervolt your NVIDIA GPU with Afterburner
- Enable CPU Undervolting by Toggling Hidden BIOS Options
- Manually Set Fan Speed with HWiNFO
- Miscellaneous Vostro 7500 Learnings
Easy BIOS Changes
The fans rarely kicked on in my laptop even with temps above 70C, and I found out that the BIOS defaulted to an option where fans were a bit quieter/less aggressive. If you enter the laptop BIOS and navigate/search for Thermal Management, you’ll see a “Ultra Performance” setting which allows the fans to be a bit louder / run more often. I switched my Thermal Management plan to Ultra Performance and it seemed to help a bit.
And while you have the BIOS open you might consider changing a few other options:
- EcoPower Mode (Disabling this stops your screen brightness from changing on its own and allows your own brightness setting to stick.)
- Lid Switch (disabling it prevents the computer from turning on/off automatically when opening/closing the lid, which is annoying)
Enable Advanced Windows Power Plan Options
- Type “regedit” in the taskbar Search field & open Registry Editor
- Go to the folder HKEY_LOCAL_MACHINE\SYSTEM\CurrentControlSet\Control\Power
- Set the CsEnabled value to 0 (change it from 1 to 0)
After a system restart, you will have extra options to choose from when you go to the Power Options area in the Control Panel:
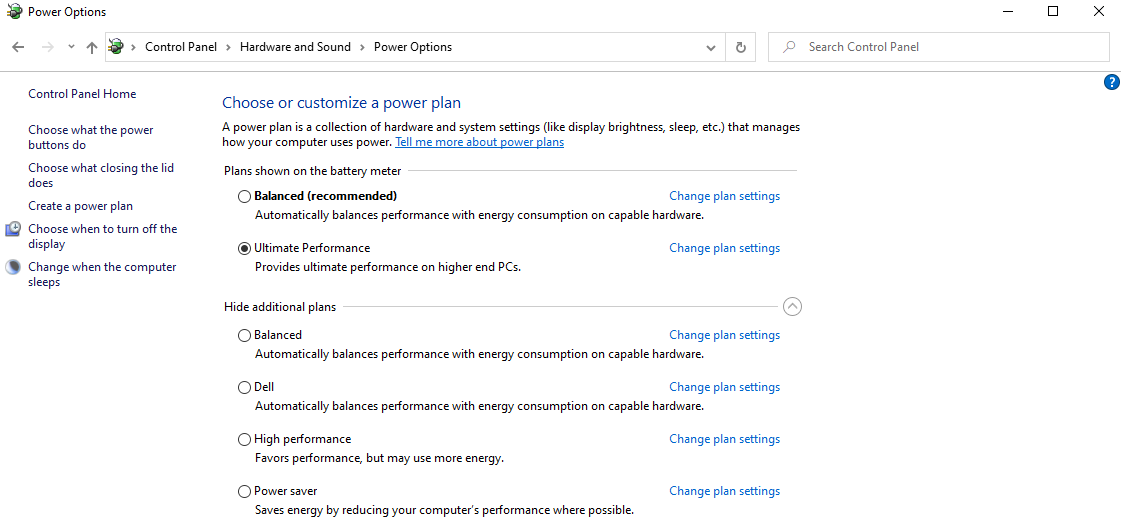
I have had a good experience with the Ultra Performance plan, with some settings customized. If you click “Change plan settings” you can further tweak your power profile. If you want to have even more tweak-able options, you can use more Registry edits to unlock additional power savings settings within the “Change plan settings” menu as well.
Initial Throttlestop Tweaks
Throttlestop is a free program that allows adjustments to processor-level settings not visible in the BIOS and Windows options. You can make multiple profiles which is great: I have a battery-optimized profile and a performance-optimized profile which are automatically applied based on if my charger is plugged in or not. Here are some Throttlestop suggestions for maximum battery life:
- Speedstep/C1E/Power Saver: turn these on
- Speedshift – EPP: set to a high number like 255 for maximum battery life, pick a lower number for maximum performance.
- Disable Turbo: turn on for maximum battery life; won’t let your computer achieve higher clockspeeds but 6 cores at 2.6ghz tends to be more than enough for the things I do on-the-go.
- BD PROCHOT – always keep this on so your computer won’t reach too hot a temperature!
- PROCHOT OFFSET (Under Options) – My Dell Vostro thermal throttles when it hits 100C, but at this point my laptop is hot to the touch. Setting this offset to 10 for me had my computer instead throttle at 90C. The CPU won’t hit as fast speeds but it keeps my laptop more comfortable to use and keeps the laptop speed down.
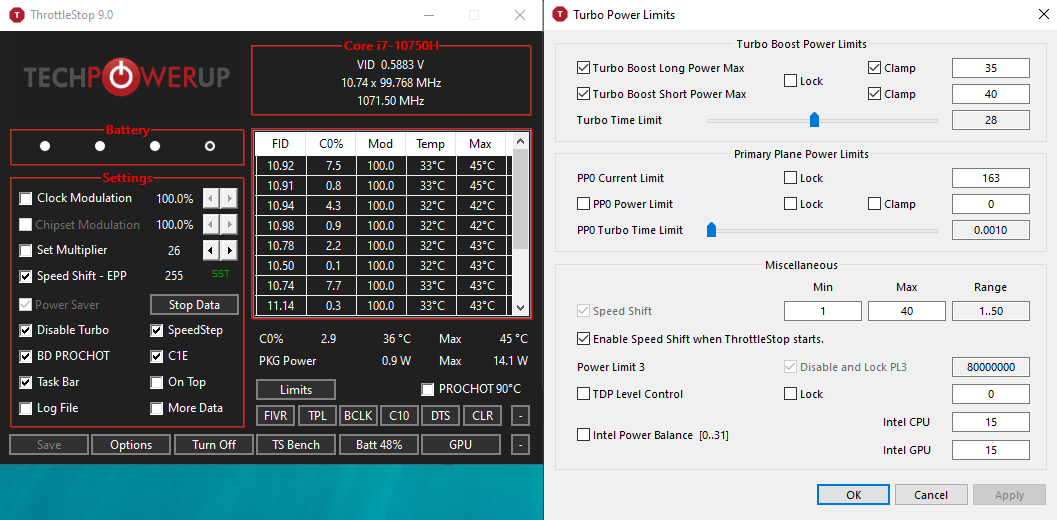
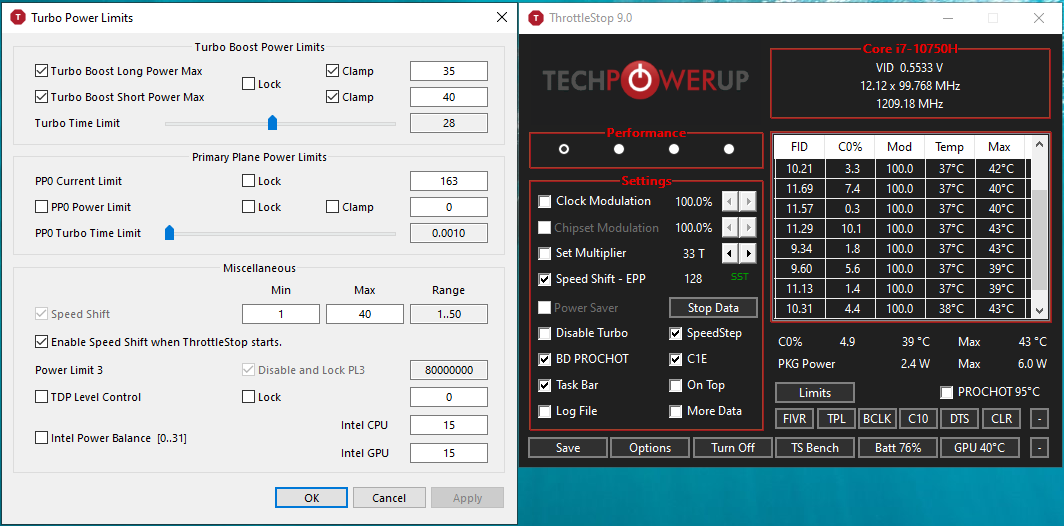
- Turbo Boost Power Limits (Under TPL) – the maximum wattage your CPU can hit. I set my Long Power Max and Short Power Max values to a much more conservative 35w/40w. (Clamp forces the processor to abide by these limits even if it has to throttle itself.)
- Speedshift Max Ratio – Changing this from 50 to 40 should keep your CPU from trying to hit too high clock speeds. If you set conservative power limits, you probably don’t need to worry about this since your power limit will also prevent higher ratios from being reached.
- Enable Speed Shift when ThrottleStop starts – turned this on because I always want the above option to be utilized.
The most fun/useful Throttlestop options are under the FIVR menu, but are locked by default on most new Dell laptops. I’ll discuss later on how to unlock this menu so you can undervolt your CPU, but be warned it takes a lot of effort to do (but definitely worth it if you have the willpower!)
Here is what my battery-optimized Throttlestop profile looks like (note some options are redundant, certain SpeedShift levels won’t be reached if Turbo is off anyway, Clock Modulation doesn’t do anything for new CPUs, but this works for me!)
Here’s what my performance-optimized profile looks like (note that the TPL options are profile agnostic. For more performance, my power limits and Speedshift max profile could probably be higher, but I’d rather keep my CPU cooler):
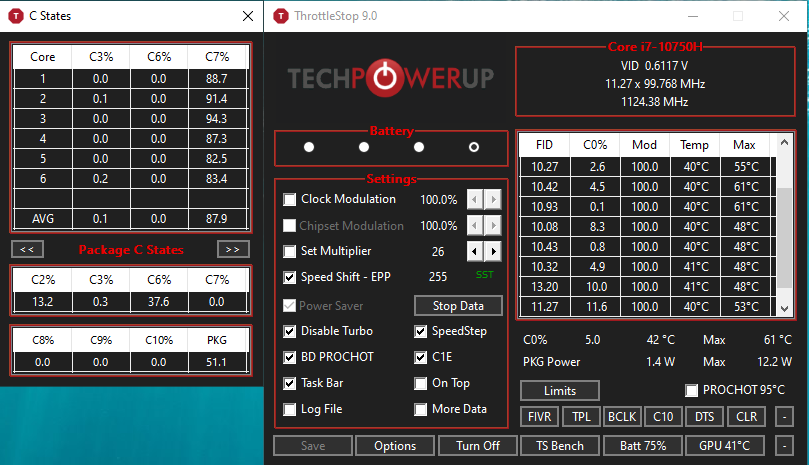
Another thing to look at in Throttlestop is your processor’s C-states. Clicking the C10 button opens a window to show you how often your processor is entering certain processor states. Ideally when you are idling, you should have your CPU package enter the C10 state at least some of the time so your CPU wattage is as low as possible / your battery life will be longer. Certain programs, drivers, or processes can sometimes prevent this from happening, and if your CPU never enters a C10 state, updating drivers or removing startup processes can sometimes help fix this.
Disable Unneeded Startup Processes with Autoruns
The less processes running on your computer, the longer your battery life. Especially if any of those processes are preventing your CPU from entering a more power-efficient C-State, as mentioned above. Autoruns is a great Microsoft tool to quickly disable processes you don’t have a need for.
Download and extract the tool, right-click Autoruns64.exe, and run as Administrator. Uncheck any/all processes you know you don’t need, which for me included a whole lot of pre-loaded Dell tools. You can be more aggressive and disable all of the things, but you’ll probably end up needing to re-enable some of them for things like your sound or brightness hotkeys to work properly.

Undervolt Your NVIDIA GPU with Afterburner
The Dell Vostro 7500 has a dedicated GeForce GTX 1650 Ti card, which allows for gaming at moderate settings. However, it also generates a lot of heat which quickly affects the CPU temperature as well. While there’s no way to reduce the power limit or set a voltage offset for a dedicated GPU on many Dell Laptops, you can still undervolt the GPU by setting a custom voltage/frequency curve.
MSI Afterburner is probably the most popular tool to tweak graphics card settings including frequency/voltage curves. When you open the app and select your dedicated graphics card, you can hit Ctrl+F to open the frequency/voltage curve, which for me, looks like this by default:
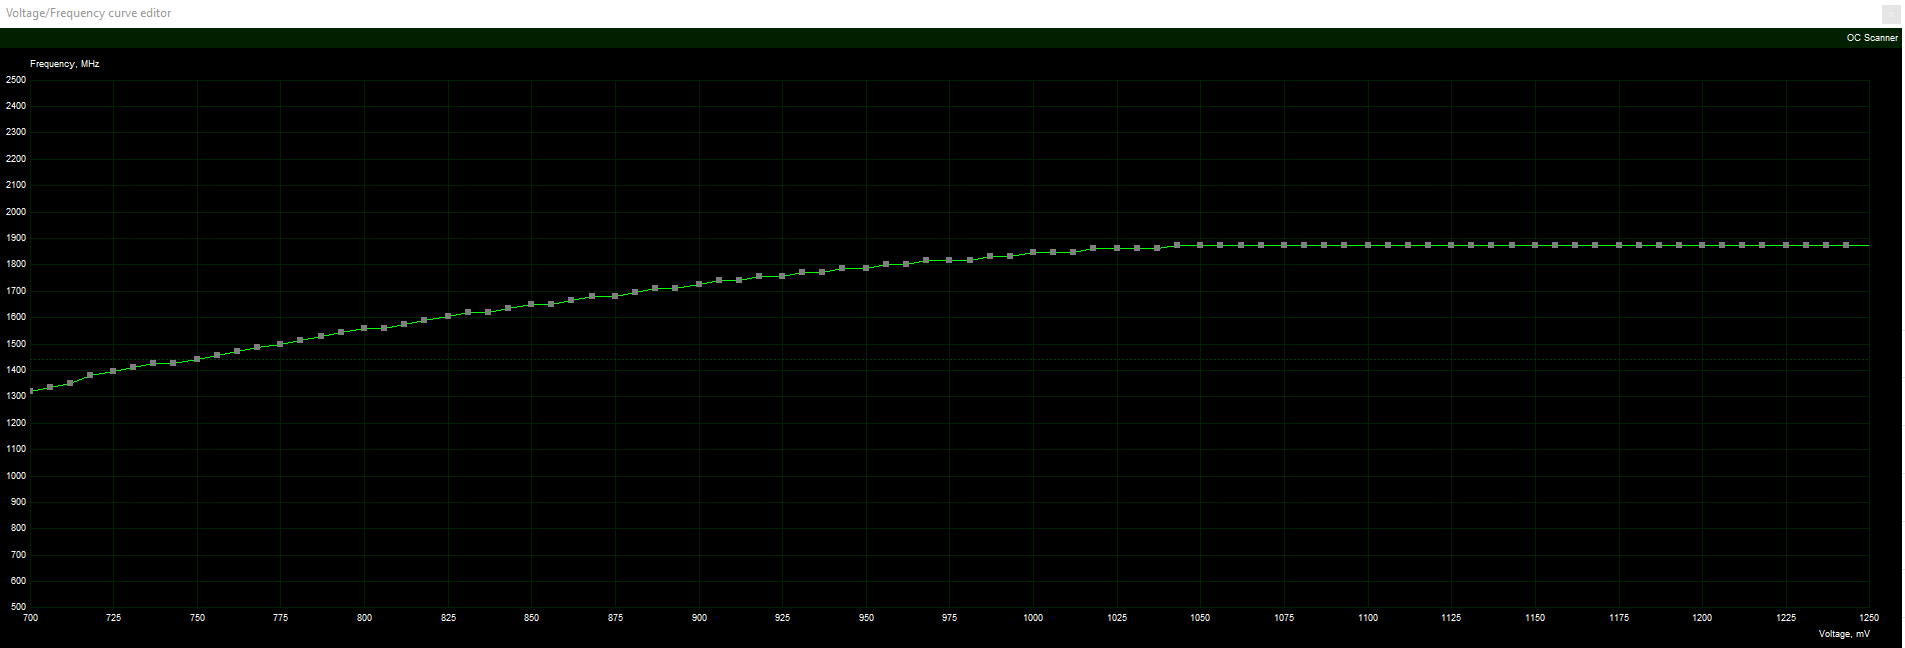
You can look at the frequency (Y axis) and voltage (X axis) to see that this default curve has the GPU hitting a max frequency of 1875mhz at 1.04v. But for me, this generates lots of heat that ends up generating heat that makes my CPU throttle sooner. So I edited my GPU voltage curve to look like this:
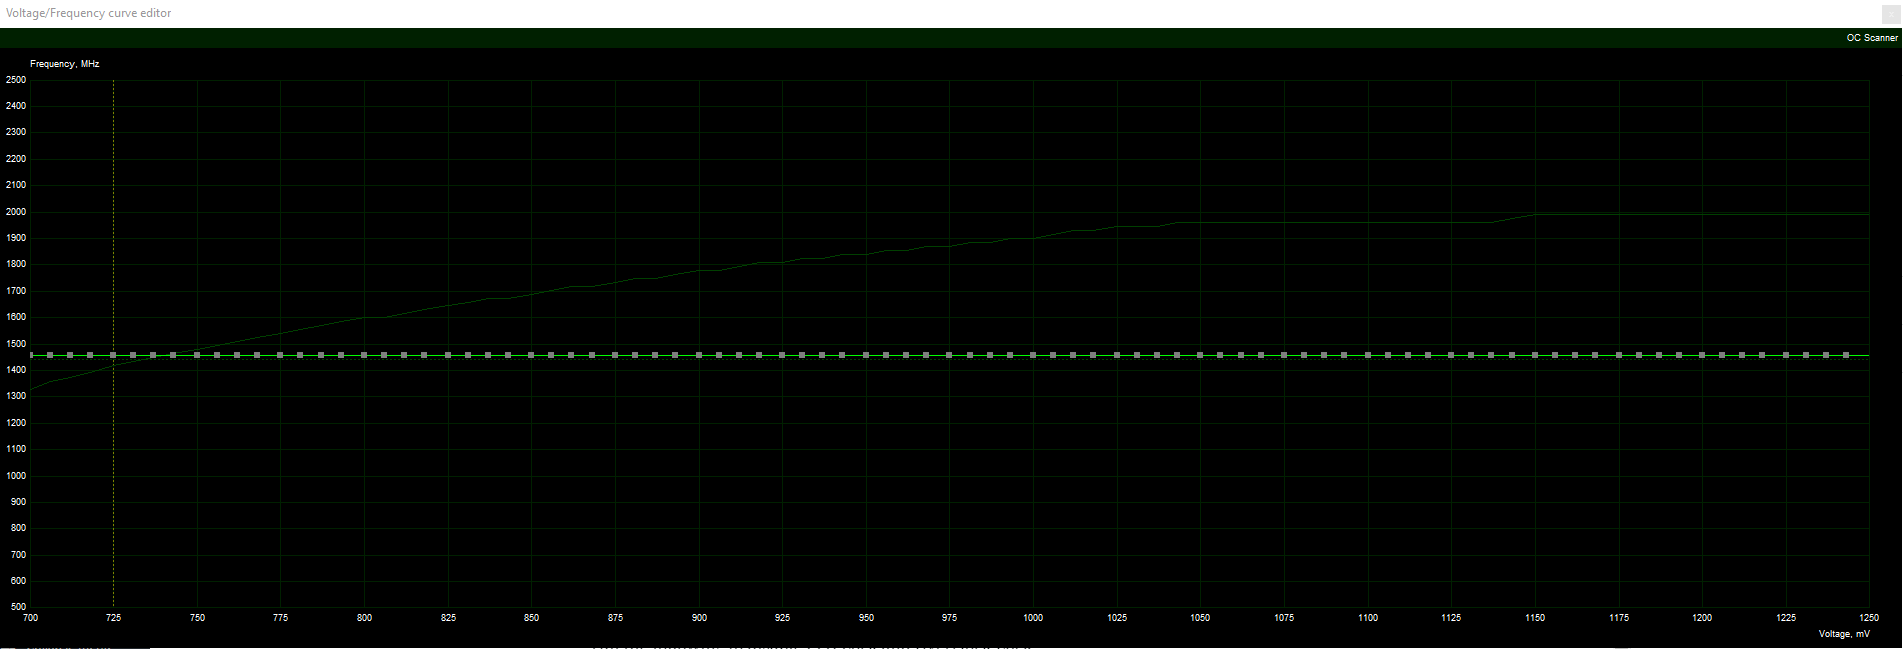
With this flat voltage curve, my GPU won’t ever hit a clock speed above 1455mhz, but it will also stay at a steady voltage around 0.7v. This keeps my GPU and CPU much cooler when gaming. It’s kind of counter-intuitive, but limiting my GPU to a lower max frequency can give me higher FPS in CPU-bound games as decreased heat from the GPU means my CPU doesn’t thermal throttle until much higher clock speeds.
There’s one big caveat about undervolting your GPU this way though: in my experience MSI Afterburner is among the processes that can prevent your CPU from entering lower C-States. Which means if you are not gaming, this can end up hurting your battery life. I thus don’t have MSI Afterburner open at startup and simply open it up/apply undervolting before I open a game. This might not be the case for everyone, but Afterburner potentially affecting CPU C-States and battery life detrimentally is something to be aware of, as it’s been reported by others as well.
Edit EFI Variables to Enable CPU Undervolting
The most effective way to reduce the heat and improve battery life is to undervolt the CPU. These options are disabled by default in Throttlestop and Intel Extreme Tuning Utility (XTU) in most Comet Lake laptops because of Plundervolt. It takes a number of steps and tools, and is not for the faint of heart, but there is a way to unlock undervolting in 2020 Dell laptops. The following steps in 2020 work for, at the very least, my Dell Vostro 7500, someone else’s G7 7700 (h/t to this poster who helped me find the right setup_var tool to use), and likely many other Dell models. This is the most technically complicated part, and I’m not responsible for any inadvertent damage done by trying the following steps. What follows is a step-by-step breakdown of what worked for me, and it may not work for you.
Step 1: Dump a copy of your BIOS.
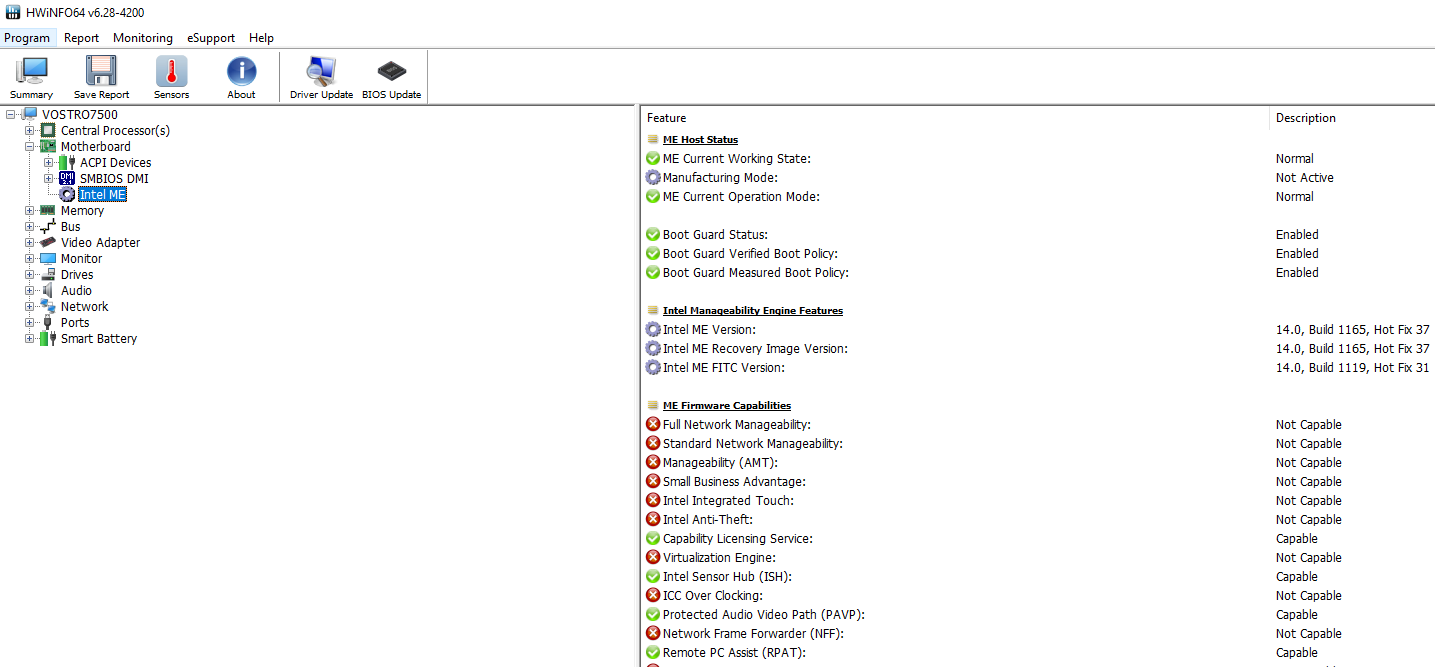
Download HWiNFO to see which version of Intel Manageability Engine your computer is using (it is listed under Motherboard > Intel ME)
Based on the version of Intel ME you are using, download the proper version of Intel ME System Tools listed here under header C2.
Unzip the Intel (CS)ME System Tools folder, and open up a command line or Powershell shell terminal window as an Administrator and navigate to the location of the “Flash Programming Tool” folder in the directory you unzipped, by changing directory with a command like the below:
cd "C:\Users\<username>\Downloads\Intel CSME System Tools v14.0.11- r1\Flash Programming Tool\WIN64"
Once in the FPT folder, run the below command (different depending on your terminal of choice) to dump your current computer’s BIOS to your PC (don’t forget the -bios part, and definitely don’t type something other than -d by accident, this tool can be dangerous if used improperly!):
# if using cmd.exe (Command Prompt)
FPTW64.exe -d "bios_dump.rom" -bios

# if using Powershell
.\FPTW64.exe -d "bios_dump.rom" -bios
Step 2. Extract Your System’s Setup Settings with UEFITool
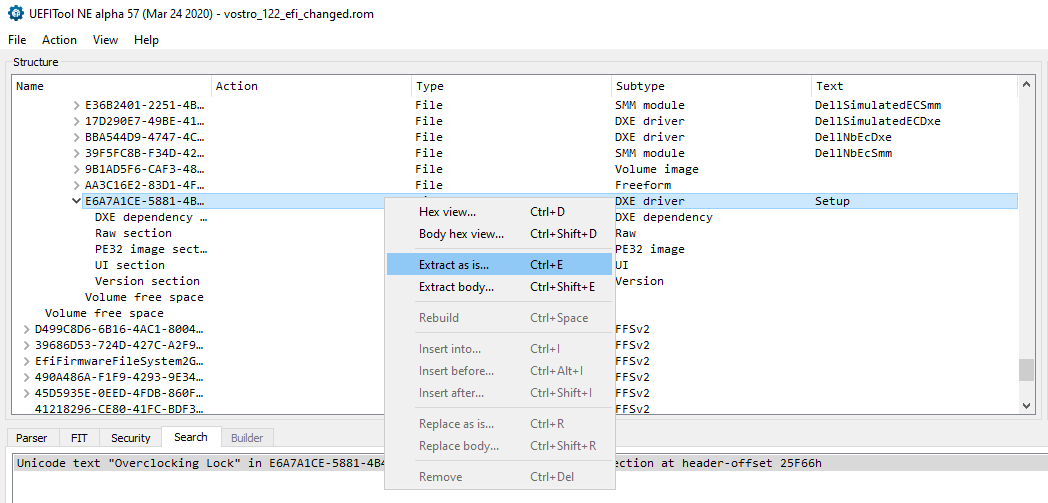
With the above BIOS dump in hand, it is now time to use UEFITool to search for the settings we care about, specifically the Overclocking. Download, extract, and open the Windows app, and use the tool to open the BIOS dump we generated above (File…Open Image File)
Once the BIOS image is opened, do a search (Ctrl+F) on the Text (not Hex Pattern or GUID) for “Overclocking Lock”. You should find one match, within the BIOS section of interest (“Setup”)
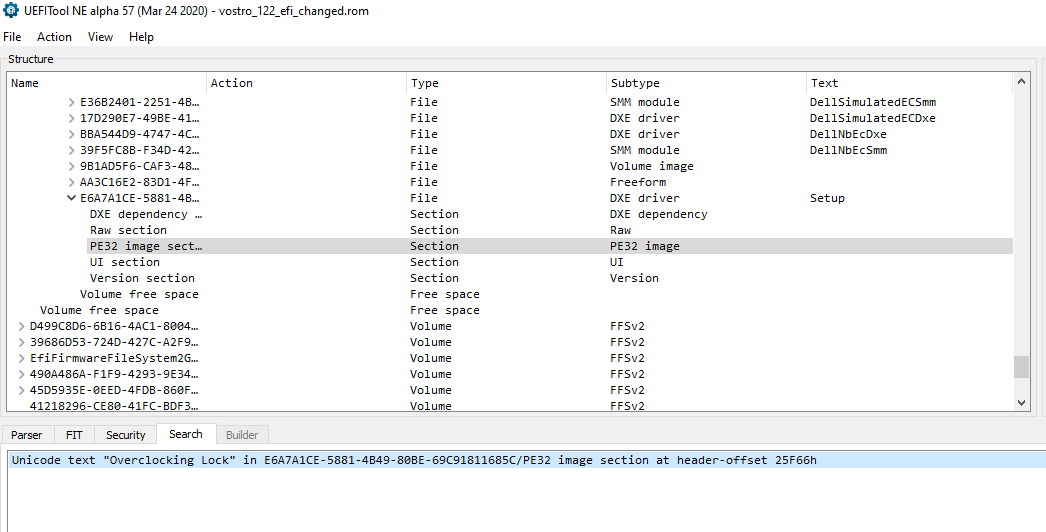
Right click on the parent File that matched your search (e.g., Click the row that has the Text “Setup”) and click “Extract as is.” Save this .ffs file somewhere, we’ll need it for the next step!
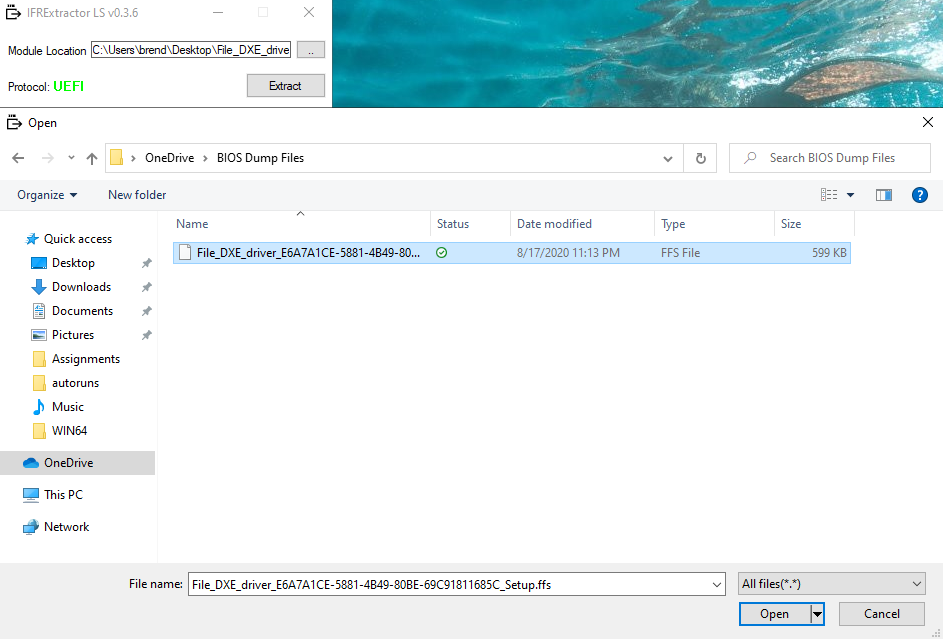
Step 3. Get a Human Readable Version of Your BIOS Setup Settings with IFR Extractor
The file we just extracted contains all of the toggle-able options your computer BIOS has, many of which Dell hides by default. We will need one more tool to get a human-readable version of these options, which is LongSoft’s version of IFR Extractor. (Older versions of IFR Extractor do not provide the location of the EFI variables you need to edit, but this one does.) Windows warned me the file might be unsafe, but I had no problems with it; for those who want to do due diligence, the repo/source code is here.)
Simply open IFR Extractor, point it to the .ffs you extracted in Step 2, and click extract. It will prompt you to save a .txt version of the file somewhere. You now a nice, human-readable text file that includes all the possible options you can change. Time to open it!
Step 4. Find BIOS Setup Options of Interest
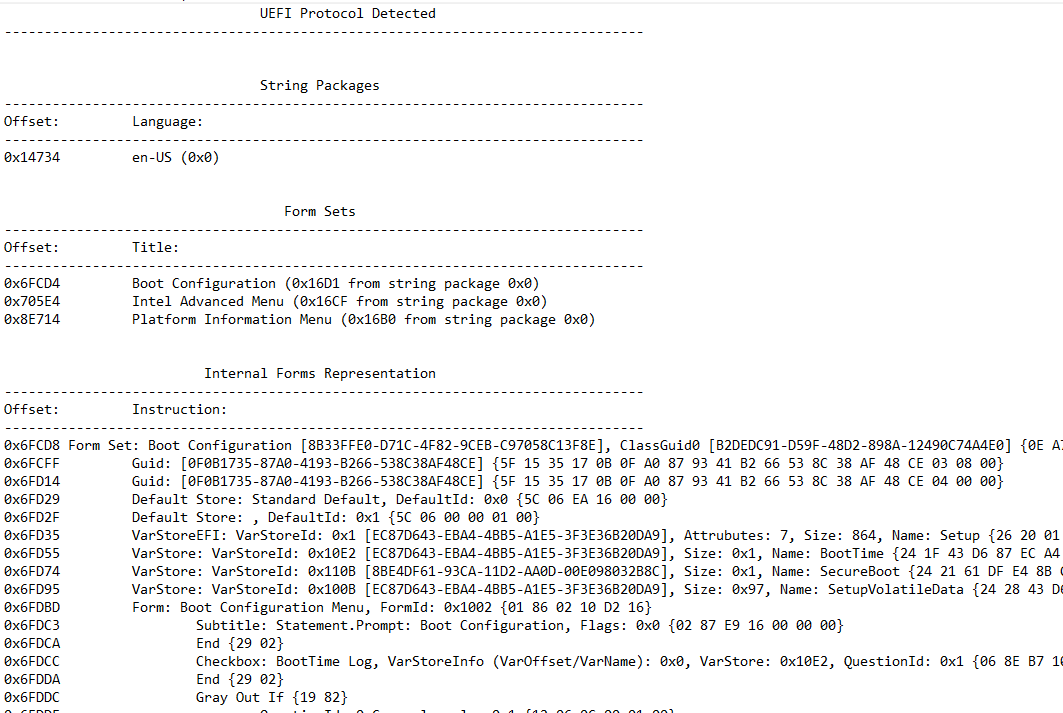
When you open the IFR extracted text file, you’ll see pages and pages of BIOS settings as well as the location of these settings variables (variables are accessed at a given VarOffset within a given VarStore) in your NVRAM. In simpler times, most BIOS options you wanted to edit were conveniently stored in a single Setup VarStore, but now they are spread across multiple VarStores, which makes things trickier.
Before we go further, it’s important to note that lots of these settings, if enabled or edited, can cause problems. I learned this when trying to force my Vostro 7500 to run a 32GB stick at its rated XMP timings which soft bricked my laptop. It refused to boot until I removed both the laptop battery and CMOS battery, which reset the NVRAM. So while there are lots of seems-cool features listed in the BIOS, it doesn’t mean they’re all going to work properly for you. Just because you can set a insanely high or low voltage offset for your CPU, doesn’t mean it won’t fry your CPU or cause it to be too unstable to boot.
That said, there are many settings which, for most Dell laptops, may not cause any issues, and can allow you to do things like undervolt. For my Dell Vostro 7500, I scrolled through the text file output by IFR Extractor and found two BIOS settings of interest (pictured below). Disabling each of them allowed me to undervolt my CPU with either Throttlestop or Intel Extreme Tuning Utility (XTU), with no ill-effects.
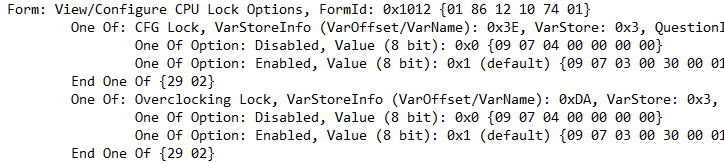
Overclocking Lock – This option is stored at VarOffset 0xDA within VarStore 0x3. If this variable is set to 0x0, the lock is disabled. If it is set to the default 0x1, it is enabled. A overclocking lock doesn’t just prevent you from making your CPU run faster, it also prevents you from changing your voltages, including undervolting.
CFG Lock – This option is stored at VarOffset 0x3E within VarStore 0x3. If this variable is set to 0x0, the lock is disabled. If it is set to the default 0x1, it is enabled. I’m unsure if you need to disable this for undervolting, but I did disable it in case I wanted to try the Hackintosh route in the future.
The VarStore that contains the Overclocking and CFG locks on my Vostro 7500 has VarStoreId 0x3. But we need the VarStore name. A Control+F reveals this: VarStoreId 0x3 has the name CpuSetup.

We now know everything we need to move on to the next step:
- Both the Overclocking Lock and CFG Lock options are stored in the CpuSetup VarStore.
- To disable the Overclocking Lock, we need to set VarOffset 0xDA to 0x0 (replace 0xDA with the VarOffset you see for Overclocking Lock on your own machine, as it may not be the same as mine!)
- To disable the CFG Lock, we need to set VarOffset 0x3E to 0x0 (replace 0x3E with the VarOffset for CFG Lock you see on your own machine, as it may not be the same as mine!)
Step 5. Prepare a EFI USB Boot Drive
We now will prepare a special USB flash drive that will allow us to set the above “lock” variables to 0x0. For readers who have used setup_var to modify EFI variables before, note that I am using a newer, special version of setup_var someone made that allows users to modify variables at a specific VarStore name. Using the older, more popular setup_var command that’s hardcoded to look at the VarStore named Setup won’t work here!
- Download the grubx64.efi file from v1.0 alpha release available here.
- Get (or format) a blank FAT32 flash drive.
- Create a folder called EFI. Within this EFI folder, create a folder called Boot.
- Place the grubx64.efi folder above into the EFI/Boot folder path.
- Rename grubx64.efi to bootx64.efi.
You should now have a flash drive with one file, bootx64.efi, located in the path X:/EFI/Boot (where X is your flash drive’s drive letter.) Time to boot it!
Step 6. Disable Secure Boot in BIOS and Boot Prepared EFI USB Drive
Before your computer can boot the EFI flash drive, you will have to disable the Secure Boot option in your BIOS. Then you can access the Boot Menu and select your flash drive to boot into a modified GRUB terminal. You should now have the ability to execute the command “setup_var” to read and edit settings of interest, which are stored as EFI variables.
Before you attempt to modify the values of our EFI variables, you should check that the variables identified above (Overclocking Lock and CFG Lock) are able to be read and are set to 0x1 as we expect them to be. It is always good to first test reading the variables before writing them!
You can use the setup_var command along with the VarStore and VarOffset values associated with your BIOS CFG Lock and Overclocking Locks to read their current values:
setup_var [VarStore] [VarOffset]
For my Dell Vostro 7500, this returned my Overclocking Lock value:
setup_var CpuSetup 0xDA
Step 7. Edit EFI Variables of Interest
After you confirm you can read the CFG Lock and Overclocking Lock EFI variables, you can attempt to change them to a value of 0x0 to disable them with this usage of setup_var:
setup_var [VarStore] [VarOffset] [Value]
For my Dell Vostro 7500, the following commands disabled my Overclocking Lock and CFG Lock:
setup_var CpuSetup 0xDA 0x0
setup_var CpuSetup 0x3E 0x0
Once you change the variables, you can simply unplug your flash drive, reboot, re-enable SecureBoot, and boot back into Windows. Everything should seem the same as it was before, except now you can change CPU voltages in Throttlestop or XTU!
Step 8. Use the Newly Enabled Throttlestop FIVR Control to Undervolt Your CPU
Now that the Overclocking Lock is disabled, voltage changes in Throttlestop will actually work. Install and open Throttlestop and look for the “FIVR” button towards the bottom middle of the Throttlestop window. Clicking it should open the below screen:
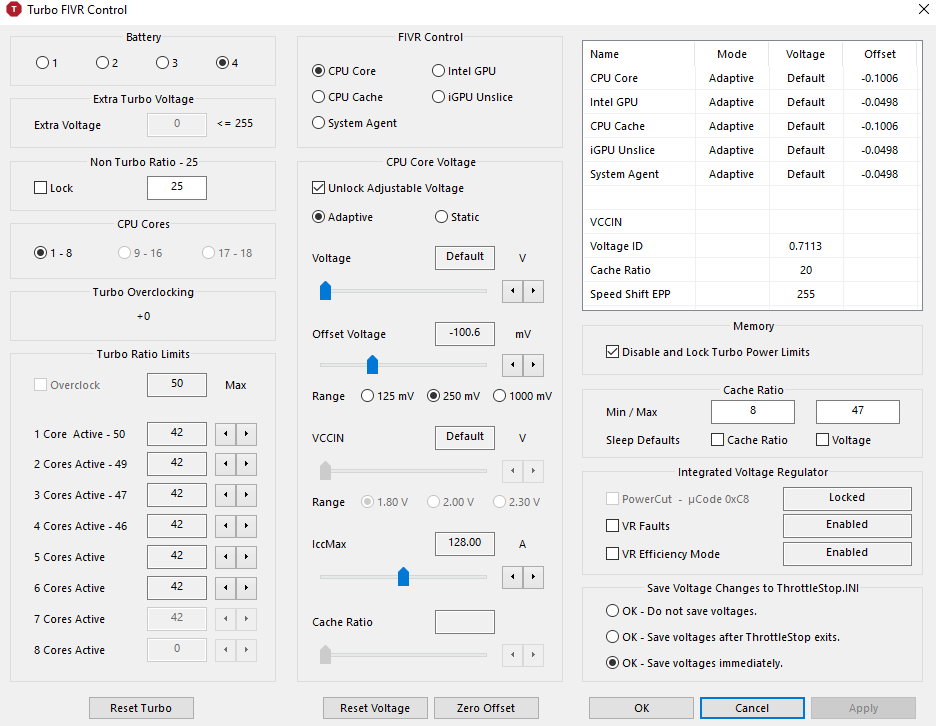
You can now change the voltage offsets of your CPU. As always, undervolting your CPU can cause instability and crashes, and undervolting is rarely a good idea in a laptop. For my Dell Vostro 7500, I was able to have a stable system with a CPU/Cache undervolt of -0.100V and a GPU/System Agent Undervolt of -.0500V. The ideal values for you will probably differ, and if you are new to undervolting I extremely recommend reading through this great Throttlestop guide before touching any voltage controls.
Once you find the optimal undervoltage settings for your processor, you might find it handy to have Throttlestop open/apply the settings at startup so you can always have better battery life and lower temperatures. Here’s a guide on how to get that set up.
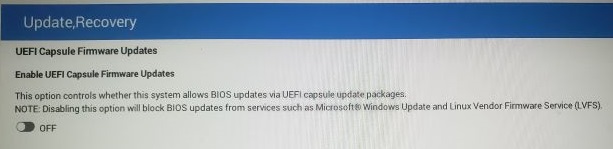
Step 9. (Optional) Prevent Dell from taking your undervolt away!
Congratulations, you made it so far (look at that scroll bar!) All that work, and you hopefully have a undervolt. But watch out: Dell has a history of rolling out automatic BIOS updates with Windows 10 that can undo the above steps, forcing you to repeat this process each time your BIOS gets updated. Worse, Dell could potentially roll out a BIOS that prevents you from undervolting at all!
Luckily, most Dells have an option in the BIOS to prevent Windows from automatically updating your firmware, keeping your undervolt safe (but potentially exposing you to security flaws that go unpatched). If you’d rather have undervolting than security fixes, look for the “UEFI Capsule Firmware Updates” setting in your BIOS and turn it OFF. Nice try Dell, but this undervolt is here to stay!
Manually Set Fan Speed with HWiNFO
If you find your fan isn’t running as aggressively as you’d like and you’re trying to run benchmarks or otherwise want the fan kicking into full gear for an extended period of time, you can manually set the fan speed with HWiNFO.
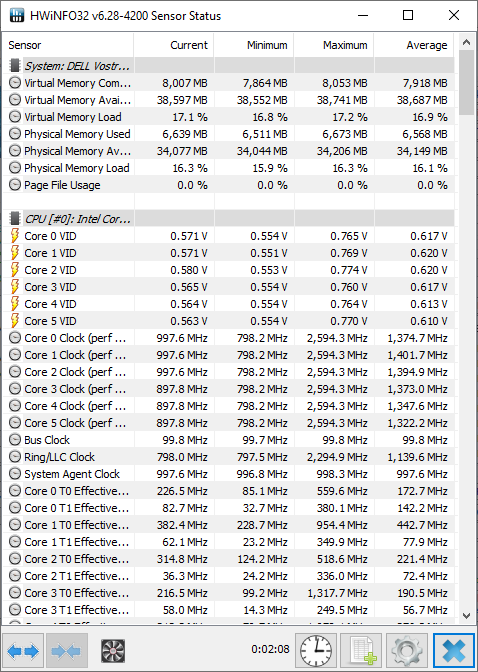
Launch HWiNFO and click the “Sensors” button towards the top of the window. You may first be met with a warning screen, but afterwards you should see this window:
If you click the fan Icon next to the arrows in the bottom left, you should get access to fan control for your laptop fans:
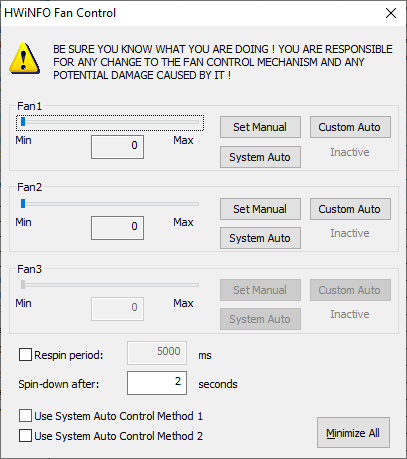
Note the scary warning at top, this is also a step that can end poorly if you run your fans harder than they’re meant to run. But for me, I was able to set Fan 1 and Fan 2 speed manually, and/or adjust the respin period to a more aggressive 100ms so the fans kicked on much more quickly.
Miscellaneous Vostro 7500 Learnings
Here are some other things I wish I knew about the Vostro 7500 before getting it:
40GB RAM Possible
The official Dell documentation suggests that the maximum supported RAM capacity is 24GB. This is not the case, as I put a 32GB HyperX Impact 2933 SODIMM into the RAM slot and my system sees the full 40GB of RAM. One caveat is that the RAM runs at a lower speed: 2666 instead of 2933.
This blog post that looked at a similar 10750H laptop suggests a negligible difference in performance differences between 2666 and 2933 RAM speeds, even when RAM timings were the same. My RAM running at 2666 has much tighter timings than my 2933 RAM, so the overall RAM increase to 40GB is definitely going to help my performance even if my RAM runs a little slower.
DP1.2 Limits Potential of USB-C Hubs
Thunderbolt 3 gives the Vostro 7500 an edge: it enables the use of eGPUs and super fast external drives. But one downside is the DisplayPort spec on the Vostro 7500 is 1.2, not 1.4. This limits your ability to drive 4K video at 60Hz to multiple displays, and will prevent you from taking full advantage of USB-C hubs that rely on DP1.4 for pushing multiple displays at higher resolutions and refresh rates. Still better than a normal USB-C port though!
Anyway, I hope this was helpful to those in the same boat as me who wanted more battery and less heat out of their new Dell laptops. Please post any questions, ideas, or other findings/comments on the Vostro 7500 in the comments below. Cheers!
Hi, thank you for posting your experience with this system. i just got mine (the i5-10300H version) about a week ago, and am looking to upgrade the memory to 16GB (or more depending on RAM prices). i am noticing that 2666MHz or 3200MHz seem to be more available, and sometimes cheaper, than 2933MHz. if the price is better, should i buy the 3200MHz, or the 2666MHz?
for reference, here’s what i see on amazon.ca for HyperX Impact:
32GB
2666MHz, CL16 = $154.99 CAD
2933MHz, CL17 = $210.39 CAD
3200MHz, CL20 = $234.99 CAD
16GB
2666MHz, CL15 = $79.99 CAD
2933MHz, CL17 = $134.74 CAD
3200MHz, CL20 = $119.99 CAD
8GB
2666MHz, CL16 = $36.99 CAD
2933MHz, CL17 = $76.81 CAD
3200MHz, CL20 = $64.99 CAD
Hi,
I actually put the HyperX Impact 32GB 2933MHz stick in my Vostro 7500, but it only ran at 2666MHz. I am unsure if the 2666MHz will work at 2666MHz, run at a slower speed, or not at all. Likewise the 3200MHz stick might run at 2933MHz, 2666MHz, or might not run at all. (The system won’t run above 2933MHz so 3200MHz will be overkill regardless.) The challenge with me using RAM above the specified supported amounts is there isn’t any support or guarantee of compatibility, so I don’t know if the downclocking of my HyperX Impact was because of the RAM volume or RAM itself. I’d probably look for a seller with a generous return policy over anything else so you don’t end up footing a bill for RAM that doesn’t work. I’d look for reviews for RAM where people say it worked well in a Dell XPS or Dell Inspiron, as chances are those sticks will work well in a Vostro too.
Will this work on an XPS 99570 with latest BIOS (1.17.1, after plundervolt “fixes”) and with CPU microcode 0xD6? Are the strings to look for (CFG and Overclocking lock) or are they different? Thanks in advance. Sadly i couldn’t do like other people that just reset their BIOS settings or downgraded and got to undervolt. Mine is still locked.
Hi there, i followed all your steps for enabling undervolt again, made sure in boot that offsets are set to 0x0 but no voltage offsets are possible to change in either XTU or in throttlestop.. any ideas why?
Have XPS 9500 with intel i7-10750H.
Hi there! I have a XPS 9500 with intel i7-10750H. Followed exaclty all your steps, everything seemed to be working fine. booted the USB and changed the values to 0x0, read the values and indeed it showed me the offset was changed succesfully. However, when booting windows back up again, after going back to factory BIOS values, still no offset change possible in XTU and in Throttlestop. Any ideas what i could do to fix it?
Kind regards
Yea it’s not working on mine either. I have the same spec, XPS 9500 i7-10750H.
I am certain the flags value are changed accordingly, but when adjusting the voltage offset in ThrottleStop FIVR, the offset value remain at constant 0.000. I am suspecting a later XPS 9500 model may have some sort of hardware lock? I am not sure.
Hi, will this process work with the new XPS 13 9310? I used to undervolt my XPS 15 and it helped with heat and battery life.
When I went to grab the Intel CSME tool, I wasn’t sure which to get. I have Intel ME v12.0 for an XPS 7590 Coffee Lake i7.
Do I want to use this one?
Intel CSME System Tools v12 r29 – (2020-12-05)
For 300/C240-series systems which run CSME v12
Hi there, I’ve followed all of your steps up until the creation of the EFI boot drive. I’m on a Dell G5 5500.
I formatted a 128GB USB 3.1 flash drive as exFAT with default allocation unit size. However, when modifying the boot order directory and adding the EFI\Boot\bootx64.efi nothing occurs and the laptop boots to windows as normal.
I am unsure how to get the device to boot to the bootx64.efi file on the USB drive. Thoughts?
I did the same procedure for the Dell XPS 15 – 9500 with the i9 on bios 1.5.3. The var store offsets are identical.
Amazing, detailed article.
Very happy with my Vostro 7500 after this. Similar specs as yours.
What worked great for me with gaming is setting the Turbo boost at 36 for all cores, and undervolting by -0.75. Temps are always under 80 degrees Celsius under full gaming load and no throttling, with GPU also overclocked. Thank you for sharing this.
I tried hackintoshing my Dell Inspiron 7501,you don’t need to disable CFG lock for it… OpenCore has a built in quirk AppleXcfmCPU or something that allows your laptop to boot with CFG lock on. Anyways, thank you for your guide and check out my hackintosh repository! https://github.com/jamieernest/Dell-Inspiron-7501-Hackintosh
“There’s one big caveat about undervolting your GPU this way though: in my experience MSI Afterburner is among the processes that can prevent your CPU from entering lower C-States.”
Easy fix for this: In Msi AB, click with the mouse on the graph in the bottom and click “pause” ( https://i.imgur.com/wb3AsNE.png ), problem solved (: It wont change anything about the undervolt / clock curve, that will stay working.
Man that was a perfect guide.
I own a Inspiron 7001 (2020 model) and the only think that worked for me, was follow your guide, and in the mid time learn something about the BIOS.
Great Work!
This Worked On my Dell G5 15 5500! Thank you so much! i was able to use the exact same commands as you did! Note: Intel XTU doesn’t seem to be working, but Throttlestop Works PERFECT
Unfortunately, it didn’t work on my XPS 17 9700 with the BIOS 1.4 version and Intel 10875H CPU. But anyway, thanks for your great tutorial.
This worked for my Dell XPS17 with Intel i9-10885H CPU. Thanks!
Maybe this is a dumb question, but any chance that this might work on a surface pro 7? This is the only place I can find that mentions any kind of workaround for the plundervolt issue. I can’t see the comments for some reason so I don’t know if this has already been asked.
It may work on other kinds of laptops, most modern laptops store BIOS settings in NVRAM/EFI variables, though not all allow access to edit them from a flash drive like Dell laptops. (An older HP Envy TS 15 laptop I have requires a physical BIOS flash since the EFI variables are write-protected)
This worked for my Dell G3 3500 with GTX 1650 Ti. Thanks!
Unfortunately my XPS 15 7590 (bios 1.9.1) refuses to boot windows using this method and bios changes. It locks up on the hello screen. It also does the same thing if I try to restore the bios factory settings as well… What a bummer. This design really needed CPU undervolting to perform well with an i9.
Thank you so much bro, it worked on my G3 3500, with the same register addresses!
will it work if i do things according to everything told here? or i have to change something ..i also have g3 3500 ..ty
First of all thank you for your excellent guide!
I am currently trying to enable undervolting on my Dell g5 15 5500 with i7-10750h to fight the thermal throttling.
When I try to execute this line in command prompt or PowerShell (launched as an admin):
FTPW64.exe -d “bios_dump.rom” -bios
I get the return:
‘FTPW64.exe’ is not recognized as an internal or external command, operable program or batch file.
Can you please help me to get it executed?
I get the same error. How did you manage to get it work?
I took a risk and just skipped the BIOS dump step, went to BIOS and applied the Brendan’s commands.
It worked!!
I found info that my Dell g5 15 5500 EFI Values are the same as in the guide, so after I booted from USB flash stick, I was able to change them and – voila! FIVR controls work in ThrottleStop. XTU’s Voltages are still greyed out, though.
I managed to get a stable profile with -89.8 mV on CPU and Cache, idling at 40-45 C and no thermal throttling at all!
My exact model is Dell G5-15 5446, so if someone has the same laptop, this guide should work for you.
Brendan, you are a saint.
P.S. Do you think that BIOS or Win 10 updates could change or lock the EFI values back?
Yes, Dell could deploy a BIOS update via Windows 10 to potentially block undervolting. I added a step to the blog post on how to prevent such updates, if desired.
Hi!
Very detailed guide but I’m not already trying it out cus I’m kind of a noob of this stuff and I wanted to know first if I need to downgrade my bios and at which version (current 1.19.1).
I have an XPS 9570 (i7 8750h) and recently I cannot run games smoothly anymore like I was used before so I tried some workaround and the best solution without undervolt is to set the power to “cool”(inside dell power manager) so the CPU runs slower and the games run… I guessed is a thermal throttling issue, so when I tried undervolt with throttlestop or XTU I noticed the voltage lock and here I am to understand how to fix this out.
In TS I tried different comibinations of settings and with the TPL very low (max 10 min 10) my cpu runs between 0.8 and 1.4 GHz (…very low) but i can play AC Odyssey at 35 FPS average… Isn’t that weird ??
As said.. I’m a noob so please teach me!
Thanks in advance
I have DELL Inspiron 7501 with i7 10750H and was looking for some solution to unlock undervolt, but it looks little bit hard for me. It is really so hard? Or its possible to do it for everyone?
My Dell G3 3500 i7 10750H could not get the undervolting done.
Changing the EFI variables successfully unlocked the sliding controls in ThrottleStop, but their values do not get applied (offset shown at top-right table shows 0.0000 on all values, and base voltage shows 1.2980 no matter what I do).
In XTU the voltage controls are greyed out. In ThrottleStop they were greyed out before editing EFI values, and became unlocked after editing – but appear to have no effect.
I’m trying and retrying everything mentioned in the guide, since 17 of June, but so far I could not undervolt.
u should select “ok,save voltages immediately” in the bottom right corner
Following this very well written guide, I was able to unlock voltage settings for my XPS 9560 on the most recent (1.22) BIOS.
Thank you very much for putting this together!
Hey there, thank you for the extensive guide. I’ve done it on my Precision 7710 w/ i7-6920HQ CPU. At first sight it worked well, I was able to change the variables for overclocking and CFG. However, the overclocking value only stays for one boot after changing. So basically I boot into EFI -> change value -> reboot -> undervolting is working -> reboot -> undervolting is locked again, the value is set to 0x1 again. CFG seems to stay at 0x0. Anyone else here with this problem or tips how to fix?
Thank you in advance
First of all, great write-up, Brendan. Easy to follow and excellent info. Unfortunately, I’m having the same issue as Angelos and Winfred. On my Dell XPS 9560, BIOS rev 1.22.1, I’m able to get the modifier unlocked and change voltages as described. However, after a second reboot, the EFI change to the Overclock variable is reset and the Unlock option is again grayed out. The CFG is still at 0x0. Just guessing here, but this EFI edit might not actually be affecting the ROM at all. I have no idea how to make this change persist, but if I find something I’ll post it here.
Hey, I actually had my ability to undervolt revert this week too! It turns out Windows Update automatically upgraded my Dell Firmware (including my BIOS) to 1.8.0 which seemed to undo the changes I made via the EFI tool. Seems like a lot of Dell models had BIOS updates rolled out in the last week or two this way, which might explain why some people lost their ability to undervolt after a recent power cycle. Repeating the steps in the post may bring the undervolting back for some BIOSes, but I wonder if Dell updated some systems in a way that prevents this kind of tweak from persisting. I reapplied the edit to my own BIOS and it has survived two power cycles so far, but I’ll keep an eye on it to see if it goes away again.
Should be able to prevent automatic BIOS updates from undoing your undervolt ability via steps outlined here: https://www.reddit.com/r/Dell/comments/8543gj/psa_set_bios_to_disable_uefi_firmware_updates_to/
I added a new step in the blog post for users who prefer undervolting to Dell BIOS upgrades, hope it helps 🙂
Thanks for the write up, Brendan.
I find myself in the same situation as Owen here. I have followed all the steps and on first boot after updating overclock variable all is well and I can undervolt. Subsequent reboots I lose my offsets and querying setup_var for overclocking variable I can see that it is updated to 0x10.
Does anyone know how to make this stick?
I should have said – I’m an XPS 15 , BIOS rev 1.24.0
Just undevolted my dell g3 3500 (i5-10300h with 1650ti )today. It works. I got scared when I heard a loud beep sound after exiting GRUB terminal..1st time doing anything with bios..but it worked. Thx
I get the following error when trying to dump the bio, with command ‘FTPW64.exe -d “bios_dump.rom” -bios:
FTPW64.exe : The term ‘FTPW64.exe’ is not recognized as the name of a cmdlet, function, script file, or operable
program. Check the spelling of the name, or if a path was included, verify that the path is correct and try again.
At line:1 char:1
+ FTPW64.exe -d “bios_dump.rom” -bios
I am in the correct FPT folder. Any ideas?
By default Powershell won’t run a command from the same folder without a .\ in front of the command name. Try “.\FPTW64.exe” instead, updated that section to clarify it is a different syntax for Powershell vs the traditional command prompt.
I’m facing a problem with the command on power shell like this
https://prnt.sc/1i8kucg
Have you tried “.\FPTW64.exe” instead?
By default Powershell won’t run a command from the same folder without a .\ in front of the command name. Try “.\FPTW64.exe” instead, updated that section to clarify it is a different syntax for Powershell vs the traditional command prompt.
I’ve tried with del XPS 9560 bios version 1.23.1:
Works after setting values Overclocking Lock and CFg Lock to 0x0 with USB stick at first reboot in both Linux and Windows.
Once you powrdown or reboot again undervolt don’t works either in Windows or Linux.
If you read the values with USB stick the option Overclocking Lock is resetted to 0x01 no matter if you reboot twice into Windows Or Linux or simply with external USB. I’ve tried to restore factory default and again no matter after two reboots undervol can’t be applied.
Dell XPS 13 (9360), 7th gen Intel
Attempt: Successful!
CFG Lock: 0x4de
Overclocking lock: 0x58d
VarStoreID: 0x1
Name: Setup
Notes: Bios 2.16 did not work but 2.13 did. I didn’t test anything in between.
2.5.1 factory reset bios
Hello, i got a 9500 with 10750H and bios version is 1.8.1 and when i change the value for Overclocking lock from 0x1 to 0x0 it does work and enable undervolting, but at the same time it disables the turbo boost, limiting the CPU to 2.6GHZ.
Changing it back locks the voltage controls again, but then it turbos properly again.
changing the CFG Lock has no effect on this
Dell Vostro 3501 11th Gen i5
Attempt: Failure!
CFG Lock: 0x43
Overclocking lock: 0xDF
VarStoreID: 0x1
Name: CpuSetup
Bios 1.7/1.6
Notes: Even though the values successfully change – confirmed with
setup_var CpuSetup 0xDF
setup_var CpuSetup 0x43
commands
both show value of 0x0
however, undervolting is still disabled!
Anyone else had success with this particular machine?
PS, Greetings and thanks to Brendan for your great guide from Cambodia – I think the image at the start of your blog is one of the Angkor Temples?
Thanks for the data point and sorry it didn’t work for you. And yes, it is a photo I took while visiting Siem Reap a few years ago! It was a wonderful visit and the temples were amazing
Dude. Big thanks for the walkthrough. Very very detailed and worked through some first time editing of variables I didn’t know existed.
This worked on my xps 15 7590. Really great tutorial and excellent instructions. I do have a question if you could answer please.
I undervolted and it worked perfect for about a week however my laptop started powering off randomly only on AC power even when temps are not high. I decided to completely remove all the undervolting and even reset the values and update/default the bios and my laptop is still randomly shutting off.
I understand its quite safe to undervolt however my laptop is a dell refurbished and I’ve only had it 2 weeks so maybe its just a coincidence and the fault was already there.
Do you know if after having removed all the software/settings. Updated the bios and restored default settings – is there any way for Dell to know that I undervolted and changed the bios manually as per your instructions? I am going to return/repair.. Obviously I will not tell them about it.
Usually their tech support is over the phone and hardware is sent out to be replaced however if they decide to replace the motherboard, I am wondering if the change will be saved in a log or something if they take it away and do further diagnosis?
Hey; I would just reflash your BIOS using the latest version on Dell’s website and reset to factory defaults and it should overwrite any BIOS variables you changed.
This guide was super helpful.
System specs
2020 Dell 9500 10750H
32GB DDR4 2933MHz
1.5TB Nvme 2.0
Note — even after updating the CpuSetup Vars via the Grub terminal, Intel XTU still greyed out/prohibited me from tuning — this seems to indicate that they’ve updated the application to identify the chipset and prohibit alterations even with the correct bios values. I WAS able to get what appears to be a stable undervolt on Throttle Stop using FIVR settings of ~86 MV. Cinebench scores showed a pretty sizeable improvement. I was able to get better scores at -90MV but in back-to-back benchmarks, I got some hanging/instability.
Thanks for the guide!
Awesome guide!
I’m on Alienware M15 R6 and it worked like a charm. Now it’s time for undervolting!
By the way, my system specs:
Alienware M15 R6, Intel i7 11800H, RTX 3070, 32 GB DDR4 3200 MHz RAM
I’ve been able to achieve a stable undervolt with TS of 89 mV. Any more than this results in blue screen.
Bios 1.5.1
VarName CpuSetup
0x43 cfg lock
0xDF overclocking lock
Awesome guide, Brendan! Thank you so much for taking the time to write this up. I have a Dell XPS 9560, BIOS is v 1.23.1 (latest release). Thanks to your excellent guide, I have my undervolt back! My variables were a little different than yours and some of the others, so I thought I’d post the commands I use here.
setup_var Setup 0x4ED 0x00 (this one actually seems to persist through reboots, could actually omit it)
setup_var Setup 0x59C 0x00
Note that on yours, the VarStore name is CpuSetup, but on mine it is just Setup. Also, my system expects a longer hex value, so there are two zeroes. 0x0 works, but it complains about it.
Same values here for XPS 15 9560 with BIOS 1.24.0.
Overclocking variable 0x59C is reset between reboots. Would be great if someone can share if they have the same model of laptop and got it to stick, and what BIOS version they have.
Thanks!
Thanks! It worked perfectly for a Dell G7 with I7 8750H
Clemente Fu
I was looking for this answer and luckily I found yours. Thanks! I’ll try with my G7 right now. Wish me luck.
Hi, Clement. I just really wonder once you were able to unlock TS on your Dell G7 with i7 8750H.
Since I even broken my mind with almost few last weeks researching any working solution for me.
I have Dell Alienware 17R5 and BIOS 1.11.0 from 2020/08/26 and I even tried Overclocking lock with my var Store 0x5BE and CGF Lock 0x65A, sorry if re-arrange them, but the values are totally precise according IFR extract from my BIOS Dump.
So actually the GNU GRUB 2.06, final one ver I have changed the Varstore from default 0x1 to 0x0 and disabled both CGF lock and Overclocking lock. Yes, in BIOS Intel VT-d is OFF, Secure Boot is diasbled (Off), TPM Secure Capsule is disabled in Windows Core Isolation is disabled and Intel Virtualization too in Registry, double check. I have Win 10 22H2. So I really sad about the unability to change the game for disabling CGF lock and Overclocking lock for My Alienware 17R5 .
As I wonder I have Dell 7210, my second family one laptop and it has i5 10310 CPU and the instruction from Brendan is pretty flawless working for in with 10th GEN.
But with the 8th GEN it is hell!!! Crazy stuff.
Tried to Downgrade my BIOS from 1.11.0 to 1.8.1 or to 1.7.0 but Dell has remover Recovery Image from official Website, ba****ds!!! I guess just to avoid any unexpected warranty issues from this trick, as they think, I guess.. And no way to find them especially for certain BIOS versions.
Clemente, can you just assist me with you recipe for retriving Undervolting for your Dell G7 with similar i7 8750H as I have. I guess the method should be pretty similar.
Will be so appreciate any assistance from you!!!
Kind regards, Anton.
I’m not extremely tech savvy, but I know from videos that under volting is helpful with thermal throttling. I tried under volting my Dell Vostro 7500 according to your guide, but when I get to the Flash Programming Tool folder, I cannot run FPTW64.exe
Nothing happens when running it. Maybe I’m misreading the instructions? Can I be corrected if I was supposed to be doing something different?
UPDATE: I switched versions from 14.1 to 14.0 and now I am getting the command prompt. However, when opening the file, it says “Error 74: Failed to communicate with CSME. This tool must be run from a privileged account (administrator/root).”
again, I would like to know what went wrong here
You need to run cmd.exe or Powershell as an Administrator
https://www.google.com/search?q=run+as+administrator+powershell&sxsrf=AOaemvJY5Fl_D2RYJvlXNUp63xB62FwyiA:1637537085613&source=lnms&tbm=isch&sa=X&ved=2ahUKEwi2ia2Czar0AhV7QTABHTpoC9cQ_AUoAXoECAEQAw&biw=1920&bih=937&dpr=1#imgrc=CzYqyjKeLm08DM
Inspiron 15 Gaming 7567
Bios 1.15, values were 0x4DE 0x58D, enabling secure boot reverts the changes.
Thanks for this guide! I bought the Vostro 7500 a couple of months ago when I enrolled in a GIS training class and found out that in all practicality, the application needed a PC with a discrete graphics card. Dell was running a special on the 7500 so I got it … before I read about all the thermal issues with this model. I thought that my seven-year old HP Elitebook ran hot, but even under full load that machine never went above 80C.
Right out of the box, I saw from HWMonitor that the 7500 would regularly hit 100C, even if the nominal temps were more in the 45C to 55C range. I started paring down the startup services and that helped a little bit. That’s when I found this page.
I tried the registry hack to get the expanded power settings, but that didn’t work. For one thing, I did not find a CSEnabled setting in that folder location.
The settings on Throttlestop though worked great. Disabling the Turbo boost, changing the SpeedStep setting, and setting the temp offset to 10C made all the difference. Now, the 7500 rarely goes over 60C during normal usage. The nominal temps are about the same, but I no longer see the temps going into those high peaks or feeling the keyboard getting as hot when some background processes get going.
And it still works fine with demanding GIS applications.
I don’t use my laptop for gaming, but I do work with the lid closed and the laptop connected to a USB dock. So, those seeing the temps regularly peaking at 100C was worrisome. This guide helped a lot. Maybe one day I’ll get around the tackling the undervolting hacks, but the tips I’ve used so far have worked great. Thanks!
XPS 13 7390 has no legacy boot option and the EFI USB is not getting recognized as a boot option, can’t manually add it either. Tried bunch of things and nothing worked.
Is there an alternative way to make an EFI USB? Thanks
You can have UnderVolt on all bios versions!!!
1. Go to Bios reset bios to default
2. Uncheck UEFI firmware capsule updates in your current bios under the security section
3. Download and run this as an administrator ( https://github.com/Brad331/NoDPTF )
4. Download your system bios that were released before December 2019
5. Downgrade bios to the old version
6. Reboot the system before windows boot Repeat steps (1 & 2)
7. After Windows boot update your bios to the latest version and it will work with whatever version is your bios now
8. This is the proof https://i.imgur.com/InzQ4qI.png
I have the overclocking lock and cfg lock set to 0x0 and in throttlestop it doesn’t say fivr locked but when I put any offset it doesn’t get applied, still shows +0.00000 offset on the panel on the right
There’s a nice tool for managing fan speed on Dell laptops: https://github.com/AaronKelley/DellFanManagement
Also there’s an alternative way to do undervolting using PowerMonkey as described here: https://mreggtart.com/posts/undervolting-windows-11-powermonkey/
Hello. I just want to thank Brendan. I followed his guideline and it worked for me. I have DELL XPS9700 with bios 1.10 and the commands and addresses are completely the same like his. I undervolted my i7 without a problem. And it is working after restart.
Hi, in your tutorial, you mention VarOffset 0x3E and VarOffset 0xDA, but highlight 0x3. How do we know for sure what the VarOffset currently is? (is it that 0x3 or 0x3E?)
I see the same 0x3 and CpuSetup in mine, but dont want to brick my machine by accidently not understanding what im doing.
At step 2 where i need to right click and extract the parent file, i cannot find any file with “setup” in the text column. I understand that what i’m doing could brick my laptop, so i just want to make SURE that i’m doing everything right.
Can anyone explain what exactly is meant by the parent file, just so i am 100% sure?
It mean that the long line of hex value that drop down that pe32 line, mine for example 899602D7-92FE-43Dxxxxxxxxxxxxx
Just wanna say thanks for a much detailed tutorial. I confirmed that it’s still working on the latest dell update version 1.8 of dell inspiron 5570. Again, thank you very much.
A little notes for later comers is that if you can find the varstore name at Step 7: it’s usually in the front, mine is setup_var Setup 0xAAA 0x0 setup_var Setup 0xYYY 0x0 (with AAA and YYY is your information of your machine).
Enjoy the modification!!
P/s: i got the step fixed from this guy on github, https://github.com/JymxB28/UV_unlock_modding_Bios, so if you follow me and success, how about give him a star ye?
Hey there, Brendan! I have a Dell Precision 7730 and I’ve edited the BIOS 3x before. I cannot for the life of me get the code that changes the Hex to 0x0 to work; VarStore cannot be located.
Here is a portion of my IFR Extraction:
0x4B0D6 One Of: CFG Lock, VarStoreInfo (VarOffset/VarName): 0x5BD, VarStore: 0x1, QuestionId: 0x395, Size: 1, Min: 0x0, Max 0x1, Step: 0x0 {05 91 AB 03 AC 03 95 03 01 00 BD 05 10 10 00 01 00}
0x4B0E7 One Of Option: Disabled, Value (8 bit): 0x0 {09 07 04 00 00 00 00}
0x4B0EE One Of Option: Enabled, Value (8 bit): 0x1 (default) {09 07 03 00 30 00 01}
0x4B0F5 End One Of {29 02}
0x4B0F7 One Of: Overclocking Lock, VarStoreInfo (VarOffset/VarName): 0x659, VarStore: 0x1, QuestionId: 0x396, Size: 1, Min: 0x0, Max 0x1, Step: 0x0 {05 91 A7 03 A8 03 96 03 01 00 59 06 10 10 00 01 00}
Awesome guide.
It works for me, in me XPS 9720 core i9 12900HK with bios 1.6.0, and in Windows 11 is necesary to unable core isolation on Security.
Thanks Brendan, my 12900hk XPS 9720 with bios 1.8.0 , win11 disable core isolation on security, works fine for unlocking the voltage control.
my code after search is:
overclocking lock VarOffset 0x10E
cfg lock VarOffset 0x43
I also have a Vostro 7500 and followed the process exactly as shown. I was able to successfully change the BIOS settings with my USB drive, but Intel XTU is still locking undervolting options. I’m using Throttlestop, but I’m not sure if it’s actually working. Any ideas?
hi, unfortunatly this didn’t worked for me, but i think it’s because of my hardware i7 1165g7, and it seems that intel has hardware level disabled voltage control; however, i was asking myself i there was any way to bios-level increase the tdp (i tried with throttlestop, but after a a short period the embedded controller overrides my new wattages, enable the s3 sleep state (becuase the new stanby consumes power and generates lots of heat) and allow my ram to run at theire full speed of 3200mhz, becuase they’re capped to 2666mhz, even if they physically are 3200. If anyone can help me, i’m ready to share more informations and the uman readable file of the bios of my system.
Hi I am also stuck at running the FTPW64.exe command. I launched PS as adminr, also tried from cmd.exe. Both versions return that FTPW64.exe is not recognized or that the path is wrong (which of course I triple checked).
Also double-clicking on the exe itself returns : “Error 74: Failed to communicate with CSME. This tool must be run from a privileged account (administrator/root).”
I am a Linux guy so I might be missing smthg regarding permissions in Windows but I am at a loss here. Thanks in advance for your help.
Still works!
Dell XPS 15 9570 (2018/2019), i7-8750h, BIOS Version/Date Dell Inc. 1.25.0, 19/04/2022 running Windows 11.
Thank you for the guide Brendan! Really excellent stuff. Tried this with my laptop and it workt first time.
The variables (although other names and values) stay at 0x00 after every reboot.
CFG Lock: 0x5BD
Overclocking Lock: 0x659
Both of them are in the setup parent (step 2) as others have also mentioned here
Works on DELL G3 3579 i5 8300h, Bios version 1.21.0
Tried to do this on my LG Gram 2022, managed to get all the way through setting the values to 0x0 however after doing so Throttlestop was still not unlocked and even when manually adjusting the values in the bios the settings don’t save….. do you think there is another lock function that is preventing the bios adjustments from being saved?
Great article, I haven’t done the entire thing yet but automatic props for being clear and unambiguous and error free in a process like this.
I saw you mentioned XMP, did you ever follow up with that to see if you could enable it? I have an xps15 9500 and I just learned what XMP is today – if the hardware supports it, it would be cool to turn that on too
Worked well on my Dell G15 5511 (i7-11800H, RTX 3060) and BIOS version 1.18. Went through and figured out the proper offsets and applied them.
For the Dell G15 5511, the following commands disabled my Overclocking Lock and CFG Lock:
` setup_var CpuSetup 0xDA 0x0 `
` setup_var CpuSetup 0x3E 0x0 `
Anyone done this undervolt enable on an Inspiron 7501? I assume it’s very similar if not identical to Vostro 7500 etc.
Just looking to see if there’s anything specific to be aware of
Can report success with the offsets detailed in the post on 2020 Inspiron 7501 (the i7 10650H model/1650Ti model)
Impressive results, combined with repaste (factory job looked insufficient to me) brought down temperatures to the point of no throttling or power limiting at all. Approx -35mV on the iGPU and System Agent were as low as I could take those without issue, -100mV on the CPU and cache.
Thanks a lot for your valuable instructions Brendan, followed through it all without any issue.
Hi all,
I want to know if this method and tools are still relevant with Dell XPS 9520 i9 12900HK with BIOS version 1.9.1?
Thanks heaps!
For reference if anyone sees this while trying to figure out how to undervolt the burning hot P16 laptop with a i9-12950HX, all of the steps up to booting into the EFI work. Unfortunately the actual step of writing to the firmware with setup_var fails. It can read the values, but writing appears to be locked down.
A bit late to the party but it works well, thanks ! I still have only one problem. It looks like very time i reboot Windows (or something else) keep reseting my Overclocking Lock to 0x01 so I have to do it every time i reboot if anyone has a solution it would be very cool to share (inspiron-7577 1060 max-q)
XPS 13 9320 here, got the variables at 0x43 and 0x10E set to 0x0, but still locked. Booted from the USB again, and the values did indeed stick.
Anyone know of any others that need to be set?
Attempting this undervolt for the second time after getting a new ssd in my G7 17 7790, at the last step, getting the following error:
GRUB loading.
Welcome to GRUB!
error: file ‘/boot/grub/i386-pc/normal.mod’ not found.
Entering rescue mode…
the file tree on my USB appears as follows:
E:\EFI\BOOT\bootx64.efi
I genuinely have no idea why this is happening and any help would be greatly appreciated
Hi and thanks for the tutorial,
I followed the steps but could not enable undervolting on my Dell XPS 15 9520 with the i7 12700H processor. I deactivated virtualization btw.
When reading the “setup_var CpuSetup 0x10E” it says: “Expected a different size of the Setup variable (got 1084 (0x43c) bytes). Continue with care …
(…)
Offset 0x10e is: 0x00”
And
“Offset for 0x43 is: 0x00”
So in theory the BIOS edit should have been successful.
I am happy to hear your thoughts
Niko
Hi and thank you for this awesomly detailled guide !
I downloaded grub_setup_var to edit my Precision M5520 bios variables in order to unlock cpu adjustable voltage. I’ve rename the file as bootx64.efi and put it in EFI/Boot on a blank fat32 drive, which I managed to boot succefully.
But when Grub command line shows up, it’s stuck in rescue mode because of this error : ‘/boot/grub/i386-pc/normal.mod’ not found
Any idea of how to get rid of it ?
Hi Guys I came across this guide as i would like to unlock Throttlestop features on my laptop.
I have extracted the Bios but i am stuck on guide step 2 to find the “Overclocking Lock”.
When I do a search I find 4 entries instead of 1.
I haven’t extracted it yet cos i am not sure if i am doing anything wrong. I have attached a screenshot of my bios that this is loaded into UEFI Tools here https://imgur.com/3oQgCDH
any help would be much appreciated thanks
These are the specs of my laptop below:
Intel Management Firmware 12.0 Build 2072, Hot Fix 90
Dell G5 5587
i5-8300H
This is normal. They all point to the same place. Just extract
Hello, has anyone already found a solution in conjunction with Windows 11? Unfortunately, the undervolting no longer works although VT was disabled in the bios. Does anyone know more?
XPS 9710 Bios 1.22.0
Well, i know this message will be lost among all the others.
Who knows who might search for the same model as mine and come with a solution.
I got a Dell Vostro 5320 with 12th Gen Intel(R) Core(TM) i7-1260P.
The notebook is perfect for me. The only complain I have is that it gets WAY TO HOT.
I tried the whole thing, did every step above, but at the end the “unlock adjustable voltage” on TPL was greyed out.
If you are reading this and your have the same intel chip as me, please let me know if you succeded in this quest to undervolt this cpu.
Can confirm that this does NOT work on the Dell G16 7620 with i7-12700H
Even booting directly from the shell into Windows 11 does not enable undervolting in ThrottleStop.
Possibly could be done with Service Mode but that’s starting to stray into even more dangerous territory
Hi Brendan, first of all thanks for the guide! I’ve noticed the link to win-raid being broken, but with some googling I found a current version: https://winraid.level1techs.com/t/intel-converged-security-management-engine-drivers-firmware-and-tools-2-15/30719
It seems to be for nothing though. It seems Intel/Dell has now completely removed the option to undervolt, at least for my XPS 9500. I have followed your guide, which led to FVIR being unlocked in Throttlestop, but changing the offset has absolutely no effect on the system anymore. I could bring it down to -1000, and nothing changed. Some googling showed that Dell/Intel patched something on a very low level the past months, which completely disregards any undervolting.
Which means my XPS is completely useless. Honestly worst piece of technology I’ve ever owned. My advice to all others: Don’t bother, save yourself the headaches and sell it.
Trying to unlock undervolting in my BIOS for my Alienware m15. Don’t know which revision, but it’s got an i7-9750H in it and uses the older case with a silver/black look. Also has RAM that’s not soldered to the mobo and is therefore upgrade-able more easily.
Anyway, I can’t seem to load the site linked for getting the Intel ME System Tools (the link goes to win-raid.com). Just keeps timing out for me. Does anyone know of another reputable source?
Hi, All!
Any possibility to undervolt XPS 9520 12900HK (BIOS possible to downgrade up to 1.8.1 only)?
alienware m17
had to use new grub found here: https://github.com/datasone/grub-mod-setup_var
setup_var_3
but worked. read the github page, slightly different commands, and of course i had different variables
Is this method suitable for the AORUS 17 XE4 laptop? On an I7 12700H processor, I really want to undervolt it, I’ve already searched the entire Internet
Brendan Greenley you absolute beautiful bastard, thank you SOO MUCH!! Not only did this fixed my undervolting issue, but this post was funny and lively to follow along. God bless you man, I hope I can buy you something for helping 😂👌
(PC: Dell Latitude E5570)
Here’s my Ethereum wallet 😅
0xdbc36921235E32e1d9F0Dac540D06882Ce774492
Dell Latitude 7390 on newest bios, my variables were in Setup instead of CpuSetup, everything worked and unlocked the settings now I have to somehow get the voltage offset to apply
I have successfully unlocked and undervolted my ASUS TUF Gaming F15 FX506LU, i5-10300H, BIOS ver .310 (newest), using your method. All register names were the same (CpuSetup, 0xDA, 0x3, etc).
I did try to downgrade bios to .307 to no useful effect, then I unlocked the .307 bios using this method, but for some reason it broke everything (first wifi card broke, then BSOD and no boot) and I had to reset everything (flash stock) from inside bios uefi setup. Later, Windows didn’t seem to like the newly flashed bios version so it windows-updated it to the newest .310 version.
But in the end I patched the .310 version no problem. 2 weeks later, smooth sailing so far! no errors no nothing
I have stopped at undervolting CPU Core at -0.125 and CPU Cache at -0.0859. Higher cache values made the system crash in games.
Link to winraid is broken and I can’t download the Intel ME System tool. Can someone please help with providing another link ?
I have a XPS 9500 with Intel i7-10750H (intel ME version 14.1).
Thanks.
Done on Dell Latitude 7490 Bios version1.37 and now free to undervolt using ThrottleStop
Thanks 🙂
0x5DC
Overclocking Lock
0x52D
CFG Lock
For 9th Gen and Older -> setup_var Setup
For 11th Gen -> setup_var CpuSetup
Thank you so much for this great guide! It works!
I have a 9510 with a 11800h and bios 1.35 (12/12/2024).
I have walked through the whole guide and in the end, my Dell 9510 with the 11800h and the 1.35 bios could also be unlocked with the procedure above for 9510.
“setup_var CpuSetup 0xDF 0x0”
“setup_var CpuSetup 0x43 0x0”
Throttlestop is running now with -0.8V on the CPU and -0.4V on the cache and GPU (lower temperatures, so less throttling). Also brought the IccMax up to the maximum amount 255.75A, turned on speed shift EPP, Speedstep and C1E. All resulted in 10% faster, lower temps and no throttling, but more important no forced Prochot limiters are kicking in anymore. The bios was putting the CPU into safe mode (only 800Mhz) during MS Teams sessions when it got too hot.
And I’m living in Brasil now, so my workspace can get quite hot.
I have had -0.9V on the CPU (teams crashed!) and -0.8V on the GPU (got a GPU crash).
Thanks Brendan. This also worked on my Lenovo Thinkcentre M720Q. The two options were even named the same, CFG Lock and Overclocking Lock. The VarStoreId was different and of course the offsets were different, but I set them both to 0x0 and now throttlestop works for me too.
On my Dell 5300 I had locked undervolting options in Throttlestop. I got ready to change parameters in BIOS with flash, but firstly tried to reset BIOS to Factory defaults. Reboot and got unlocked options in Throttlestop ! 🙂
Set -116.2 for CPU core and cache, -55.7 for iGpu.
But how to enable Advanced Windows Power Plan Options in Windows 11 24H2 I didn’t understand 🙁